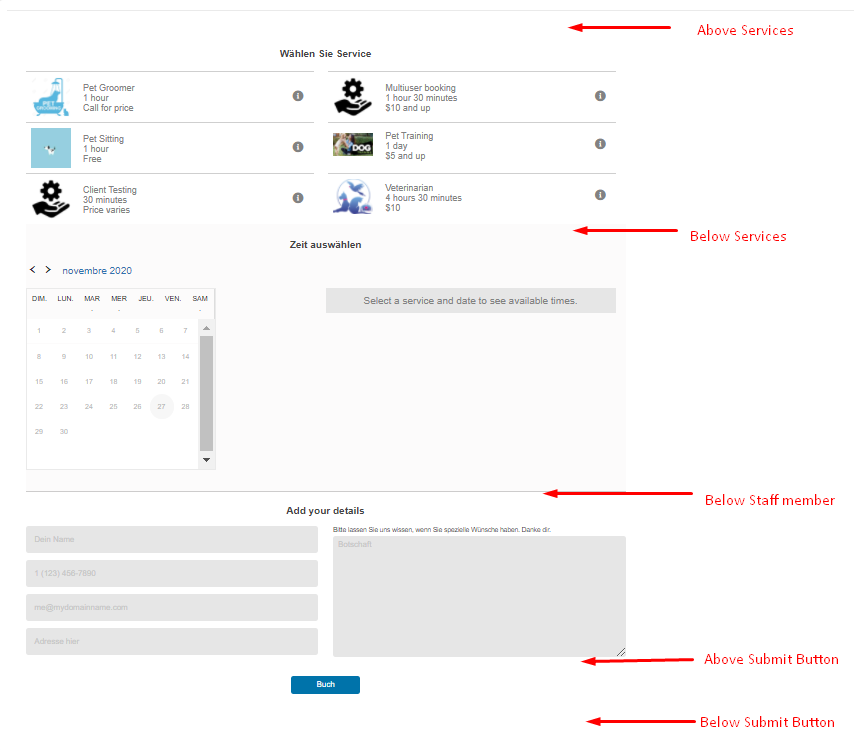
Microsoft Bookings does not provide custom field support in it’s API. So, we have created a alternate method to support custom fields in the Microsoft Bookings. We divided custom fields support in the 5 section, you can put custom fields or content before services section, after services section, before staff member section, before submit button and after submit button as shown in the attached screenshot.
Short-code Parameters for adding custom fields
aboveservice=’servicetop.php’
belowservice=’servicebottom.php’
belowstaffavail=’staffbottom.php’
belowcontactdetail=’contactbottom.php’
customsubmit=’aftersubmit.php’
These templates can be found in the
“/wp-content/plugins/o365-wp-ms-booking/templates/views”
Please copy these files in your active theme to avoid override by future updates
“/wp-content/themes/your-active-theme/o365-display/ms-booking/views/”
What type of custom fields you can create for Microsoft Bookings
1. Input box
2. Textarea
3. Select box
4. Radio buttons
Note: class of these fields must be “o365_ms_booking_customfield” because the data will be grabbed based on this class.
Custom Fields Type Examples: 1. < input type="radio" id="female" name="gender" value="female" class="o365_ms_booking_customfield" > 2. < textarea name="message" rows="10" cols="30" class="o365_ms_booking_customfield" data-name="About">The cat was playing in the garden. 3. < select name="cars" size="3" class="o365_ms_booking_customfield" data-name="Cars"> 4. < input type="checkbox" id="vehicle1" name="vehicle1" value="Bike" class="o365_ms_booking_customfield" data-name="Vehicles">
Custom fields can be managed based on the Service. Like if you want to show input boxes for Service 2 and checkboxes for Service 2 then the dive structure looks like this.
  < div class="service1 services-divs">
    < input type="radio" id="male" name="gender" value="male" class="o365_ms_booking_customfield" data-name="Gender" >
    < label for="male">Male

    < input type="radio" id="female" name="gender" value="female" class="o365_ms_booking_customfield" >
    < label for="female">Female

    < input type="radio" id="other" name="gender" value="other" class="o365_ms_booking_customfield" >
    < label for="other">Other
  < /div>


  < div class="service2 services-divs">
    < input type="radio" id="male" name="gender" value="male" class="o365_ms_booking_customfield" data-name="Gender" >
    < label for="male">Male

    < input type="radio" id="female" name="gender" value="female" class="o365_ms_booking_customfield" >
    < label for="female">Female

    < input type="radio" id="other" name="gender" value="other" class="o365_ms_booking_customfield" >
    < label for="other">Other
  < /div>
Note:
1. One div stands for one service
2. The div should have the following classes
A. services-divs (This class will hide all the service divs initially)
B. service + service number ( Service number divs should be replaced by the div service number like: for first service class will service1, for second service class will be service2)